
How To Setup Epson Printer On Windows & Mac (Easy Steps)
Are you in search of a guide that explains how to setup Epson printer with ease? Fear not! You are in the right place. In this blog, you will learn how to connect a printer to your computer and how to install the printer driver by following the step-by-step instructions.
A day before yesterday, I received a call from my cousin, Alex, who just got his new Epson printer. He was asking me about the Epson WiFi printer setup. For this, I had to go to his house and help him with the setup.
As a printer expert, I have dealt with many cases related to printers. Be it troubleshooting or printer setup, I have done almost everything. So, it will be easier for me to guide novice printer users like you who just want to get started. Without any further ado, let’s get started.
How to Setup Epson Printer: Quick and Easy Steps
For the Epson printer setup, you will have to follow the steps given below. Here, I am going to cover two devices including Windows and Mac. So, let’s start with PCs first. However, if you are a Mac user, you can move to the second section.
For Windows
- First of all, you have to turn on the Epson printer.
- Once the printer is on, you should arrange any cable (Ethernet or USB).
- Then, grab one end of the USB or Ethernet cable and insert it right into the printer and PC’s USB or Ethernet port.
- After that, you have to go back to your PC screen.
- Next, click on a Start button (it looks like a Windows icon located at the taskbar).
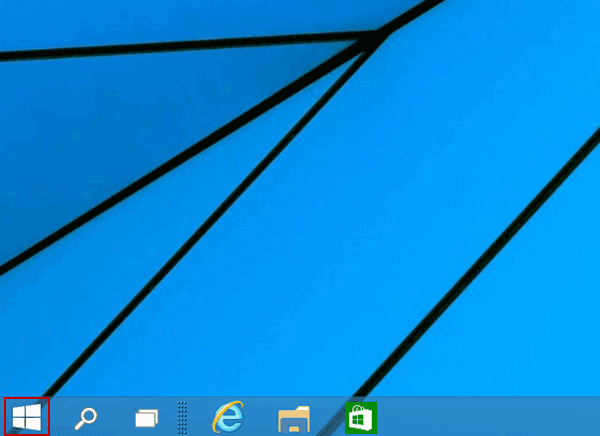
- Now, you have to find the Settings app and click on it.
- As you open the settings, you will want to select the Printers and Scanners option.
- Finally, click on Add a printer or scanner and add your printer by following the display instructions.
For Mac
- Go to your printer’s control panel and hit the Continue button when the “Know Your Wireless Network” screen appears.
- Then, you have to follow the on-screen steps to choose the wireless network (you will find it on your printer’s control panel).
- After that, you will see the Add Printer window on your MacBook.
- Now, you will need to select the printer product from the displayed drop-down menu.
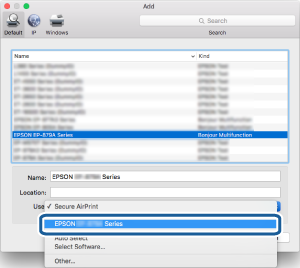
- When you have selected the printer, you will need to click on the Add Printer option.

- Afterward, you will need to select the Print Test Page.
- Next, proceed by hitting the Continue button.
- Also, choose Set Up Fax or hit on Continue if you don’t want to setup Fax settings right away.
- Lastly, you will need to follow all the steps displayed on your screen to complete the process.
You have completed the process of how to setup Epson printer to Mac. In the next section, you will learn to install a printer. Let’s dive in.
How to Install Epson Printer on a Computer?
In order to learn how to setup Epson printer, you have to install the Epson printer on your computer. This is a must after establishing a connection between your computer and Epson printer. Now, let’s see the steps below:
Windows
- First, you will need to turn on your printer.
- After that, you need to open an internet browser on your PC.
- Go to the search bar and visit the Epson official website.
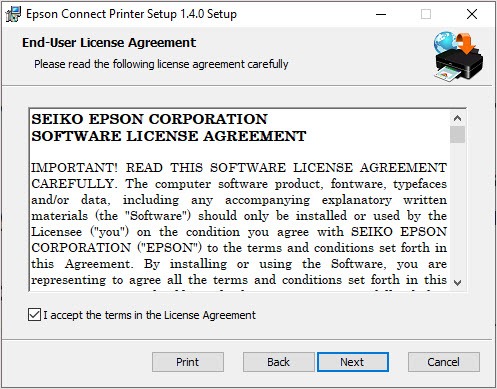
- From the website, you have to download the Epson Connect Printer Setup Utility.
- Now, you will have to accept the agreement and then select the Next button to proceed.
- In order to begin the installation of your printer, click on the Install tab.
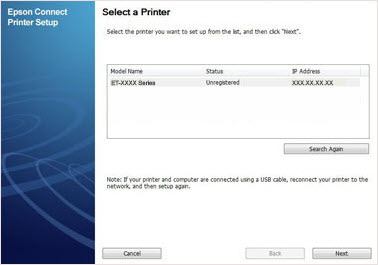
- Thereafter, opt for the product from the menu and move ahead by selecting Next.
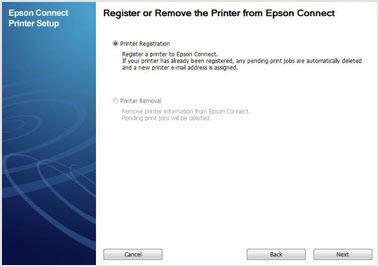
- Next, you need to select the radio button indicating Printer Registration. Then click Next.
- Here, you will have to click on Agree > Next.
- After that, you should click on the OK button.
- Finally, create your new account and click on the Close button once you have created your account.
macOS
- Visit Epson’s official website on a Mac computer and then proceed with the next step.
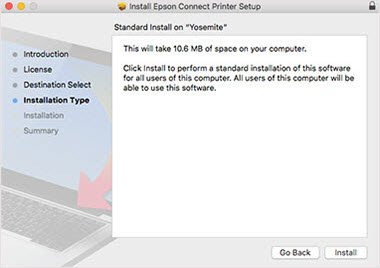
- On the next screen, hit the Install tab > Close.
- After that, select your printer and click Next.
- Then, you will need to select Printer Registration.
- Now, you will have to click Next > OK.
- Next, you should scroll down and mark the checkbox.
- Also, select Next to accept the terms & conditions.
- Here, you will have to create your account or use an existing one.
- Finally, you should click Close.
By now, it might be clear to you how to setup Epson printer. If so, you need to start printing without any interruption.
Frequently Asked Questions(FAQs)
Before you connect, you have to ensure that your Android phone and printer are connected to the same wireless network.
- First, you have to open the Epson iPrint app.
- Second, you have to click on “Printer is not selected.”
- After that, you have to click your printer on the
Local tab or manually add a printer to your network by clicking on the Manual IP tab.
In order to enable your Epson Connect, you have to install and open the Epson Printer Finder app. After that, you must tap the printer you want to use. Now, you will need to select Enable Epson Connect. Hit Next and confirm the T&C. Load the paper into the printer & tap Next.
Note: If
the displayed screen shows tap Epson
Connect Services, then you will need to follow the steps given on the
display and register your printer and the user account.
In order to sign to your Epson account, you have to try the following steps:
- Navigate to the Epson
Connect User Page.
- After that, you will need to enable JavaScript and Cookies for the browser.
- Now, put the
registered email address in the username field.
- Then, you
have to enter your password in the password field.
- Lastly, you
have to click Sign In.