
How To Download Epson Connect Printer Setup: Full Guide
Epson printer users might think of printing and scanning their documents with the help of online services. Yes, Epson Connect is a cloud-based service that allows them to print from anywhere, irrespective of whether they are. Since I am a printer executive, I often get queries related to setting up this service. Most users want to set it up properly on their devices. However, they fail to perform the correct Epson Connect printer setup. If you are in a similar situation, just go through this detailed post for a clear understanding. This blog is going to be extremely helpful for all non-tech-savvy users.
No matter what device (Windows or Mac) you are using, you will find it easy to set up this software. After all, this guide covers thorough steps related to the setup procedure.
Epson Connect Printer Setup Utility Download on Windows
Do you want to link your Epson printer with a Windows computer? Then, download and install Epson Connect on your Windows PC. Move forward with the quick and easy-to-follow guidelines discussed in this section.
Step 1: Download Epson Connect Printer Software Setup
To connect your printer and device, you first need to download Epson Connect on your Windows system. The process is as easy as the downloading process of any software.
- Go closer to your Windows computer system.
- Then, select your favorite web browser.
- Once you choose the browser, open it.
- Now, move to the search bar on your preferred browser.
- In your following move, navigate to the Epson printer's official site.
- When you are on the official page, look for the Epson Connect printer software.
- After that, click on the Download button next to the software.
- Wait a few times till the software downloads on your Windows systems.
- Finally, the software will open automatically.
These steps help Epson printer users download the Epson Connect printer setup utility to their systems. But you can't start working without installing it. So, go to the next section of this post and learn the installation steps.
Step 1: Install Epson Connect Printer Setup
To use the software, you are initially required to install it after downloading. If you are not aware of how to proceed with the installation, I can help you with these convenient instructions. Go through them and install the software on your Windows PC.
- First, sign into your Windows computer.
- Remember to log into your system as an administrator.
- The software installation windows will automatically open.
- If not, double-click on the software's installer file.
- The End-User License Agreement window will open.
- Navigate to the I Accept the Terms and The License Agreement box.

- Tap on the Install button then.
- Later, follow the Finish button.
- After that, select your printer from the available list.
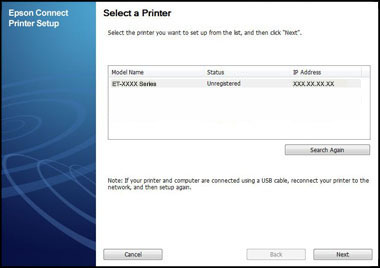
- However, if your printer model doesn't appear on the list, hit the Search Again button.
- When you tap the Next button, follow to select Printer Registration.
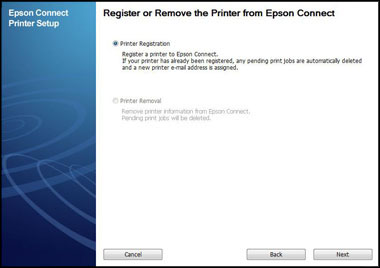
- Later, look at the Register a Printer to Epson Connect message page.
- Click on OK on the page.
- Those who have an Epson account need to select the Register a New Product With An Existing Account option.
- Otherwise, hit the Create an Epson Connect Account.
- Then, follow all the prompts on your screen.
- Finally, the registration process will close.
Hope you carried these steps carefully. One thing you should not forget is to tap close after the process ends. So, do the setup and enjoy working with our Epson printer. But what if you are a Mac user and want to set it up? Well, we will cover this in the next section of this blog. So, read out the next section for the setup.
Download Epson Connect Printer Setup on Mac
It is easy to set up Epson Connect on a Mac device. This section of the blog post will thoroughly cover the process of downloading and installing. Let's first download the utility.
Step 1: Downloading Epson Connect Printer Software
The first thing to have the utility on Mac is to follow the download process. Since this process is pretty simple, you will do it in a few minutes. These are the steps you need to follow.
- The first thing to do is open your Mac system.
- Once you open it, open the browser.
- After that, go to the search bar in the browser.
- Then, navigate to the official Epson site using your browser.
- Next, select the Epson printer model you have.
- Now, locate the Epson Connect printer software setup.
- Choose the above utility and look for the download option.
- When you find the button, click on the Download option.
- Lastly, wait for some time and allow the file to download completely.
With these steps, the utility file will download to your Mac system. Next, what you need to do is to install the file. Find the steps to install below.
Step 2: Installing Epson Connect Printer Software Utility
Most often, the setup files automatically open after downloading. If it doesn't happen, you have an alternative option. Try out these steps.
- First of all, go to the downloaded utility file.
- Next, click on the Continue option.
- Now, a dialog box with a Software License Agreement opens.
- Read all the terms carefully, then click on the Agree button.
- When the prompt appears, hit Install.
- After that, a Window will appear.
- Select your printer when the Window asks you to choose a printer.
- On the following screen, tap Next.
- However, if you can't find the printer, follow these steps.
- Then, go to Finder on your Mac system.
- Choose Applications, then Epson Software.
- Discover the Epson Connect printer software setup.
- Double-click the file, then hit the Radio button.
- Once you see the Register a Printer to Epson Connect message, click OK.
- Next, agree to all terms and conditions.

- Later, create a New Account or Register a Product with a current account.
- Go with all the prompts on the screen.
- In the last step, hit the Close button.
Now that your printer is successfully installed on the Mac system. Thus, what's up to you? Obviously, it is an error-free and smooth printing journey.
Conclusion
Epson Connect is enabled through the Epson Connect printer setup utility. Both Windows and Mac system users can use it with their systems. This software brings in an efficient way to connect the printer (any model of Epson printer) to print photos, emails, or any other types of files. Just learn how to perform the setup and you are ready to go with the printed document in your hand.
Frequently Asked Questions(FAQs)
To activate Epson Connect, you need to
follow some easy guidelines. Here are the steps you need to take.
- Install the Epson Printer Finder application on your device.
- After that,
open the app.
- Next, click
on your Epson printer.
- After that,
click on the Enable Epson Connect
option.
- When a
screen appears, select the Epson
Connect Services option there.
- Follow all
the on-screen prompts.
- Lastly, register your printer.
First of all, this utility allows users
to print and scan from anywhere and on any device. It just needs the presence
of an active internet connection. Apart from this, there are other benefits
too. These are.
●
Easy printing of emails,
documents, and photos.
●
Automatic detection of the
printer.
●
Efficient printer
registration.
●
Comes with a simple interface,
including step-by-step instructions.
Start the downloading process using the
steps given below. This will allow the download of the utility without much
effort.
- The first thing to do is visit the Epson printer's official site.
- There,
search for the Epson Connect Printer Setup software.
- Hit the Download button next to the
software.
- Now, wait for a few minutes to allow the software to download.