
How To Connect A Brother Printer To Your Computer?
Can't figure out how to connect a Brother printer to your computer? Don't worry! In this article, we will guide you through step-by-step instructions on connecting a Brother printer to your Windows and Mac via a Wi-Fi network so that you can connect it quickly and easily.
Wireless connections, whether using a Wi-Fi network or Bluetooth, can be placed almost anywhere without worrying about cables. But once they're up and running, they make life easier, but the lack of a physical connection to a computer can make them a bit more practical. So, without further ado, let's read on.
How To Connect a Brother Printer To Your Computer Via Wi-Fi?
You must use the Li-ion battery or supplied AC adapter to connect a Brother printer to Wi-Fi. If the Brother printer is powered by Ni-MH batteries, you can't connect it to Wi-Fi.
Follow the basic instructions below to connect a Brother printer to your computer using a Wi-Fi network:
- Initially, connect your PC to a Wi-Fi router or access point. (If your PC is already connected to Wi-Fi, skip this step.)
- Then, connect the Brother printer to the same Wi-Fi router or access point.
- After that, connect your computer and the Brother printer.
Depending on whether the driver software is installed or not, perform one of the following:
- The driver software isn't installed - set up a wireless network when installing the driver software.
- The driver software installed - manually set up a wireless network for Windows and Mac.
Set Up a Wireless Network When Installing The Driver Software
Before you start, ensure the SSID (Wi-Fi name) and password (network key) of a Wi-Fi router/access point.
- First of all, ensure that your PC is connected to a Wi-Fi router or access point. (If your PC is already connected to Wi-Fi, skip to the next step.)
- After that, download the driver software from “support.brother.com.”
- Then, double-click on the downloaded file to start the installation process.
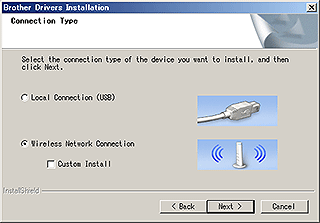
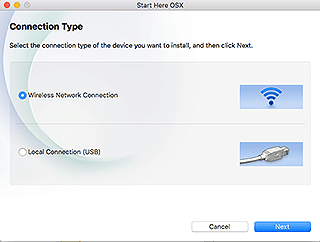
- Select the "Wireless Network Connection" option, and press the "Next" button.
Windows
Mac- For Windows PC, select the "Brother Peer-to-Peer Network Printer" option.
- For the Mac system, proceed to step 6.
- For Windows PC, select the "Brother Peer-to-Peer Network Printer" option.
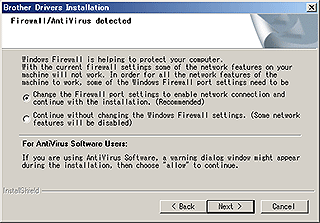
- For Windows: Select "Change firewall port settings to enable network connections," proceed with the installation, and hit the "Next" button.
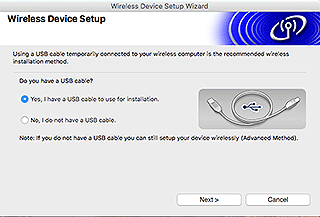
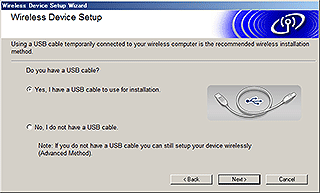
- For Mac: prepare a USB cable. Click on the "Yes, I have a USB cable to use for installation" option.
- WPS users: If you want to use WPS mode, select the "No, I don't have a USB cable" option.
Windows - Follow the on-screen steps to finalize the driver installation, and go to step 13.
- Select the Wi-Fi name you confirmed earlier, and tap the "Next" button.
- Confirm that the check box is selected when the installation verification screen appears and click the "Next" button.
- Make sure the Wi-Fi name is correct, and click the "Yes" button.
- Follow the on-screen prompts to finalize the driver installation.
- Select the "Finish" button to close the installer screen when the installation is done.
- When the printer is connected to a Wi-Fi router or access point, the printer's Wi-Fi lamp lights up.
- After that, ensure the Editor Lite LED is turned off.
- Start the P-Touch Editor feature and select your printer model from the list.
- Now you can enjoy editing and printing wirelessly from your computer.

Manually Set Up a Wireless Network With The Driver Software Installed (For Windows)
- Ensure that the driver software, P-Touch Editor, and Printer Settings Tool are installed on your PC.
- Next, you have to power on your Brother printer.
- Ensure the printer's Wi-Fi lamp is blinking. If the Wi-Fi lamp is not flashing, turn on the Wi-Fi, and push the Wi-Fi button for 1 second.
- When the Wi-Fi lamp flashes, you can release the button.
- Now, connect the printer to your PC using a USB cable.
- Start the printer setting tool on your PC, and select Communication Settings.
- In the Wireless LAN tab in Wireless Settings, do the following:
- Ensure the Infrastructure option is selected for Communication Mode.
- Input the Wi-Fi name you've used before, or tap the Search option and select a Wi-Fi name from the available list.
- From the next screen, input your Wi-Fi password and click the Apply button.
- When your printer and a Wi-Fi router or access point are connected, the printer's Wi-Fi lamp stops flashing and lights up again.
- After that, confirm that the Editor Lite LED is turned off.
- Start the P-Touch Editor feature and select your printer model from the provided list.
- Now you can edit and print wirelessly from your Windows PC.
Manually Set Up a Wireless Network With The Driver Software Installed (For Mac)
- First, download a compatible driver package from “support.brother.com.”
- After that, you need to double-click the downloaded software file.
- Then, open the Utilities folder and locate the Wireless Device Setup Wizard option.
- Now, double-click on Wireless Device Setup Wizard.app.
- Perform the on-screen steps to set up wireless settings between your printer and a Wi-Fi router or access point.
Note: We suggest using a USB cable to finalize the setup process. - Next, connect your PC to a Wi-Fi router or access point.
- Ensure that the Wi-Fi function of your PC is activated.
- Select the Wi-Fi name that you've used before. A connection between your PC and a Wi-Fi router or access point will be established.
- If your PC is already connected to Wi-Fi, skip to the next step.
- In the next step, ensure the Editor Lite LED is turned off.
- Start the P-Touch Editor feature and select your printer model from the list.
- You can easily print wirelessly from your Mac system.